
Create presentations from your reports
When creating tables and charts in Excel, you will most likely want to share your insights with your peers. The standard tool for presenting your findings is PowerPoint. That’s why we made it incredibly simple for you to export your reports from Excel to PowerPoint. If you want, your data will even be updated automatically!
Before you start creating your presentation, keep in mind these general guidelines:
- Remove Excel gridlines before exporting tables/charts to PowerPoint (Page Layout -> Gridlines -> View)
- Choose an appropriate chart
- Adhere to the IBCS Standards based on the HICHERT®SUCCESS rules
How to move your charts to PowerPoint using Zebra BI:
Sometimes, a single slide is enough to present your data. Some other time, you would like to move several objects at once or even create your whole presentation inside Excel before exporting it. Therefore, we compiled 3 fast ways to export your charts and tables to PowerPoint using Zebra BI.
1. Exporting a single chart
If you only need to export a single Zebra BI chart, all you have to do is:
1. Select your Zebra BI chart 2. Click ‘Export’ in your Zebra BI interface and choose ‘Start new presentation’. (This will open a new PowerPoint presentation and add your selected chart.)
2. Exporting multiple objects (multiple tables, charts, groups, etc.)
If you want to export multiple objects, there are two ways to do so:
Option 1: Select a range of cells behind the objects you want to export
The process here is similar to exporting a single chart. The difference is that instead of selecting the chart itself, you select a range of cells. In essence, you define an area you wish to export. Click Export in the Zebra BI interface and you’re good to go.
Option 2 (Recommended): Define a Print Area in Excel
We found that if you have a lot of PowerPoint slides to create, the following process works best:
- Design the whole slide in Excel (complete with the titles, comments, etc.)
- Define a Print Area
- Select the Print Area
- Click ‘Export’ and choose ‘Start new presentation’
Here’s what our example PowerPoint presentation looks like:
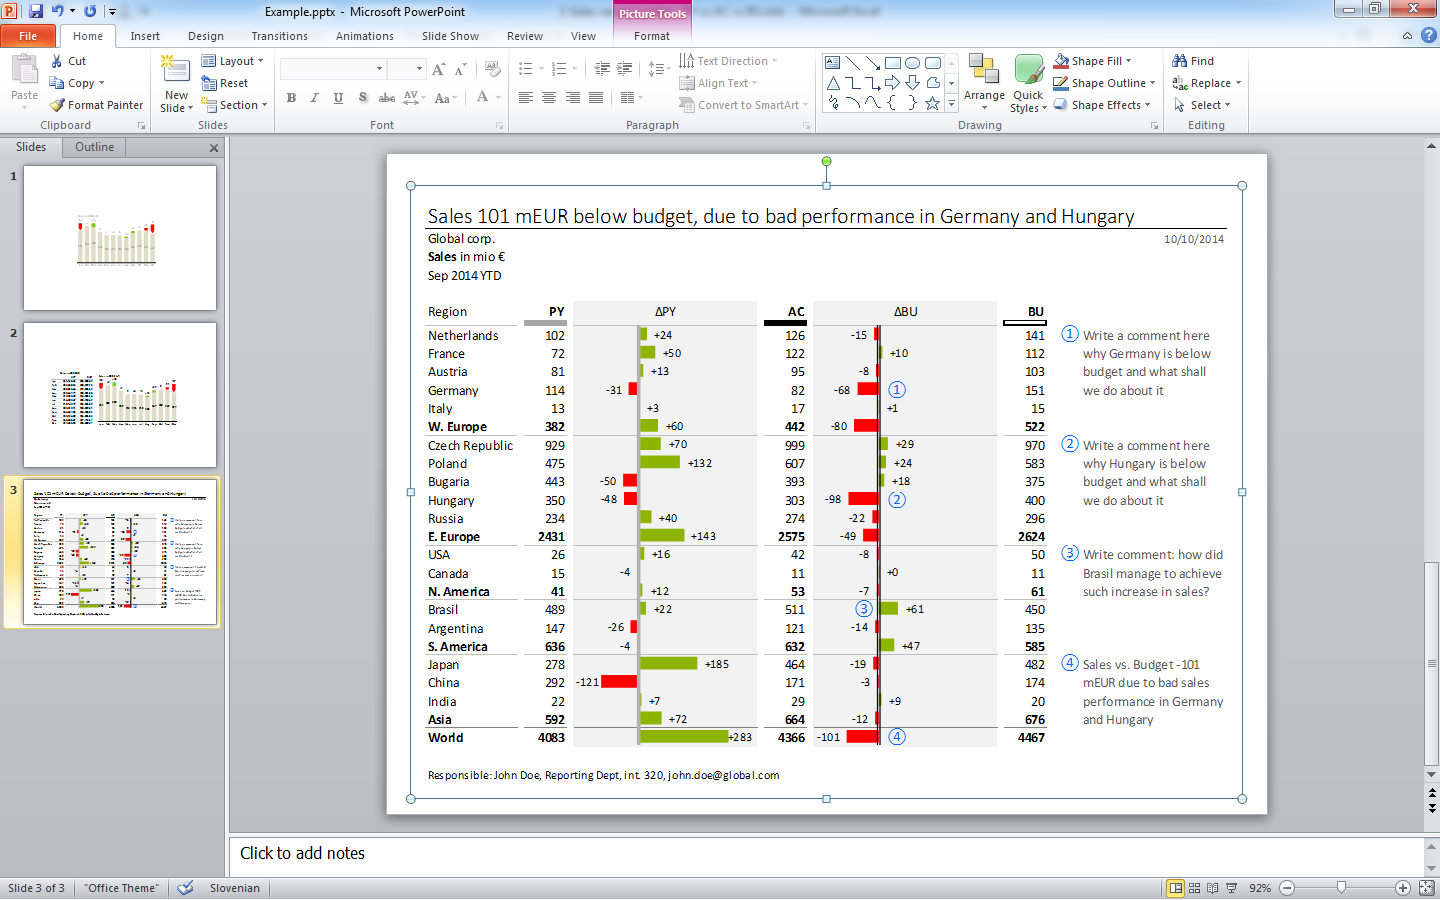
Hint: The reason why this works best is that all exported slides will have the same size! For the first slide, you need to click on ‘Export’ and choose ‘Start new presentation’. Just like in the previous step, this will open a new PowerPoint presentation and add your selected chart. For all following slides you can use the ‘Export’ + ‘Presentation’ buttons.
3. Prepare a whole PowerPoint Slide in Excel
You can also create a whole slide in Excel, before exporting it to PowerPoint. For this, just add all your data and text on your Excel spreadsheet and export it using one of the methods described above. It is important to keep in mind the basic rules for best practice reporting.
Hint: If you want to create your presentation entirely in Excel, keep in mind to include the main elements of best practice business reporting as defined by IBCS: 1. A main message, 2. A chart, 3. Explanatory details
How to move several slides to PowerPoint using Zebra BI:
Basically, this works just like creating a single slide. However, you do not need to click ‘Export’ and ‘Start new presentation” this time. Instead, you can use ‘Export’ and ‘Presentation’ to add slides to your existing presentation. The most convenient way to create several slides is to use ‘Option 2’ described above. This will make your presentation much nicer to look at, because all slides will have the same size.
Hint: If you want to add more slides to your presentation later, you should keep your Excel-file opened. Once you have closed and reopened the Excel-file, clicking the ‘Export’ ‘Presentation’ button will open a NEW PowerPoint presentation. You can still move slides from this new presentation to your original one, though.
Starting a new PowerPoint presentation using Zebra BI:
If at any point you’d like to start creating a new PowerPoint presentation, click on the Export dropdown menu and choose “Start new presentation”. You’ll get a notice that all newly exported items will go into a new PowerPoint presentation.
Note that clicking on this button doesn’t actually export anything yet. It just tells Zebra BI that you’re finished with your current presentation and you want to start a new one. Everything you export from now on will be exported to this new presentation.
Useful tips
- Zebra BI does all the exporting in the background. You might think nothing happened, but before you panic check your PowerPoint presentation – It’s all there! 🙂
- For your presentation to be automatically updated, you first need to save the Excel-file.
- Also, if you created an automatically updatable presentation that you intend to use again later, make sure to remember where you saved the data origin (i.e., your Excel-file).
- Try to make your page layout fit the dimensions of PowerPoint before you export it.
- Of course, always remember to save your presentation!
Read next: